Working with HDR Media in Apple Final Cut Pro X.
This is a reprint from my article appearing on “Larry Jordan Edit Smarter” website https://larryjordan.com/articles/working-with-hdr-media-in-apple-final-cut-pro-x/
 Over the last couple of months, James Duke and I have been emailing about his work with HDR images in Apple Final Cut Pro X.
Recently, James wrote of his experiences and I asked his permission to publish them here. As always, both of us are interested in your comments.
Thanks, James, for sharing your experiences with all of us.
Larry
P.S. I made minor text edits in James’ article to improve flow or clarity, and resized his images to allow easier display on the web.
My Winding Road to HDR
James Duke
www.lifestorypictures.com
I work on travel films/videos targeted to on-line viewing. This particular form, with its landscape and architectural shots, can benefit greatly from HDR technology. I have to add that my budget is quite limited.
About 2 years ago I decided to move to HDR shooting, editing and grading. At the time, HDR TV sets just started to sell in earnest, YouTube initiated HDR services and Vimeo was getting ready to do the same.
I acquired a 4K ENG camera (Panasonic DVX 2000) which internally can record 8-bit Log footage and with an external recorder can handle ProRes 422 HQ 10-bit Log. The HDR grading could be done using Black Magic’s Davinci Resolve. In October of 2016, Mystery Box published an excellent five-part paper, “HDR Video”, describing their HDR work and their project workflow.
As I was shooting my Spain travel video, I kept hoping that when I edit, Apple FCP X will catch up with enough HDR functionality and I will not have to learn yet another great, but new, piece of software. First, FCP X introduced Wide Color (Rec. 2020) and then v10.4 got HDR. Also, the new version of Compressor acquired H.265 (HEVC) codec, albeit without hardware acceleration.
Shooting travel videos at most sites of interest in Europe rarely lends itself to a tripod/camera/external recorder combination. So, with DVX200 only 30% of the material was in 10-bit Log. As a result, I can add my voice to the opinion that while 8-bit Log improves dynamic range, to get to a good HDR image one must have 10-bit color. As one might expect, it is especially so with landscape shots. To avoid this tripod limitation, I am now starting to use a Panasonic GH5 4K mirrorless camera with the intraframe internal Log 10-bit recording and excellent stabilization. This camera has an added advantage of not being as conspicuous as an ENG camcorder.
I host my videos on the on-line video hosting sites. I post each film on both Vimeo and YouTube. I connect the stories on my website to Vimeo for a higher quality (used to be higher – I am not sure if it still is) and post the same videos on YouTube for a wider audience.
About the final product and its delivery. Both Vimeo and YouTube host HDR content. At first, to reach a wider audience, one had to produce two versions – HDR and SDR. Now both hosting sites have a reasonable HDR to SDR conversion, but require special attention to metadata (more on this later).
The “bottleneck” for a larger audience is often assumed to be the small installed base of HDR TVs and the practically non-existing computer supporting hardware H.265 decoding and monitoring. The computer limitations are still with us. This year saw a few new LED monitors with improved dynamic range and wider gamut but, as of now, because of burn-in image issues, OLED technology is not used in these monitors. On the other hand, the HDR 10-bit OLED TVs are plentiful and are selling briskly starting at around $1.5K.
The “bottleneck” is in having to use a front-end “box” in addition to the HDR TV. For Vimeo, it is a combination of Apple TV 4K and HDR TV and for YouTube, it is Chromecast Ultra 4K and HDR TV. These combinations, together with setting and learning a Vimeo or a YouTube app inside these front boxes, is currently a serious limitation. I do not have marketing numbers, but one could guess that this environment reduces the HDR audience. It is only reasonable to assume that Vimeo, YouTube and TV manufacturers will eventually simplify the ability to play on-line HDR media.
Initial FCP X Project Setup and Workflow
- iMac (late 2015, 32GB RAM, 27-inch 5K/480 nits/10-bit display) also used as a secondary display for the Viewer and the Scopes
- HP Z32x (32-inch, 4K/300 nits/10-bit) monitor as the main FCP X Desktop
- ThunderBay 4 (4-drive, 24 TB, Thunderbolt 2) RAID 5 as an external storage
- LG OLED 55 B7A (4K, 1,000 nits, 10-bit) TV as an external monitor
It is important to note that I am using a second monitor to view HDR media. This monitor is connected to the iMac via ThunderBolt.
The RAID was connected to the iMac’s first Thunderbolt 2 (TB 2) output and “from there” daisy-chained to a HP monitor, while the TV was connected via Thunderbolt to a HDMI 2.0 adapter to the iMac’s second TB 2 output.
NOTE: I am using an HDR TV for color grading because it is the best I can afford. Independent sources, measuredLG TV peak brightness between 700 and 820 nits. It is not a reference monitor and it cannot be calibrated to come several miles close to the likes of SONY $45K BVM-X300, but the pictures are gorgeous, and the color is close to DCI-P3. It is very popular and I am also using this TV as my “Target Consumer TV.”
Since this is a consumer TV, it has many HDR picture modes and one should be careful in selecting the mode and settings in which to grade, but that is a whole other story.
My FCP X workflow, as it related to video, was:
- Camera memory card (MPEG-4 AVC) or Recorder Disk (ProRes 422 HQ)
- Convert MPEG-4 AVC into ProRes 422 HQ using Apple Compressor
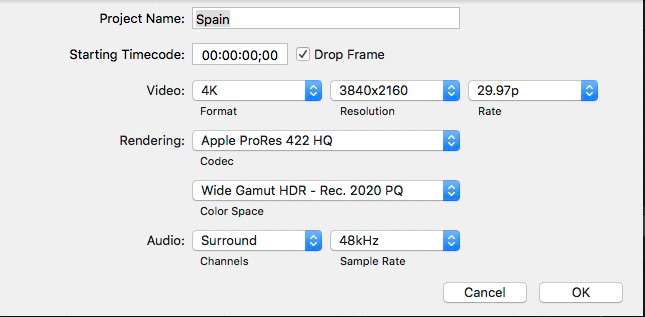
These are the settings I used to setup a new project.
- Import ProRes clips into FCP X
- Cut the project
- Apply Log Camera LUT to the individual clips
- Primary grade each clip using my favorite color correction plugin
- Secondary grade, where needed, using FCP X color tools
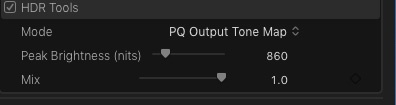
- Apply Apple HDR Tools PQ Output Map (see screen shot below) to soft-clip peak brightness at about 820 nits. Usually this required setting “Peak Brightness (nits)” parameter to around 850 – 950
NOTE: When adding an HDR title, I compound a title and then apply a color correction plugin to make title brightness correspond to the PQ-level brightness of the other visuals in the timeline.
Next we need to specify the HDR metadata:
- Select the project in the browser
- Click Show the Share Inspectoricon in the Inspector
- Set 4 values in the HDR Mastering Display Metadata
- Set 2 values in the HDR Content Metadata
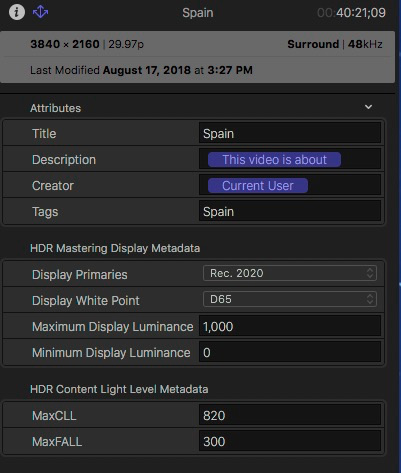
These illustrate the HDR Mastering Display metadata settings I used.
- File > Share > Masterfile as ProRes 422 HQ
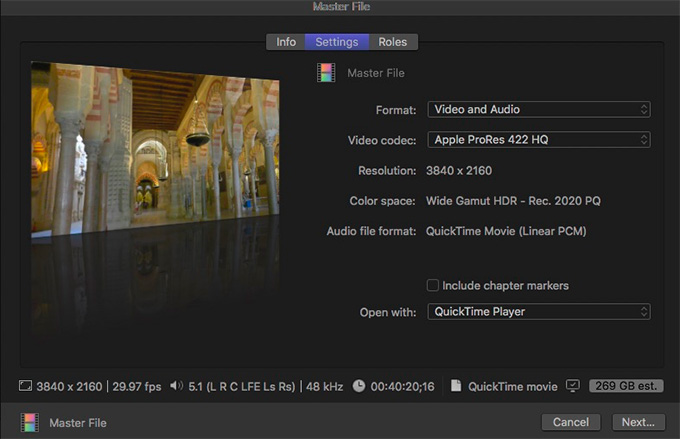
These are the Share export settings I used.
The resulting 40-minute film is about 261 GB in size.
NOTE: When working with HDR media, it is essential you make final color adjustments beforeoutputting the master file.
There were several unexpected results I encountered during primary color grading. To simplify my work, rather than color grading Log clips “from scratch” using FCP X color tools, I started by applying a Camera LUT. As we all do, I try to expose my shots properly and not clip my highlights (unless, I need an effect of some kind).
In fact, the FCP X scopes showed that most of my Log clips were exposed correctly. But after applying the LUT, the bright spots in the FCP X Viewer on both iMac and HP displays appeared overexposed.
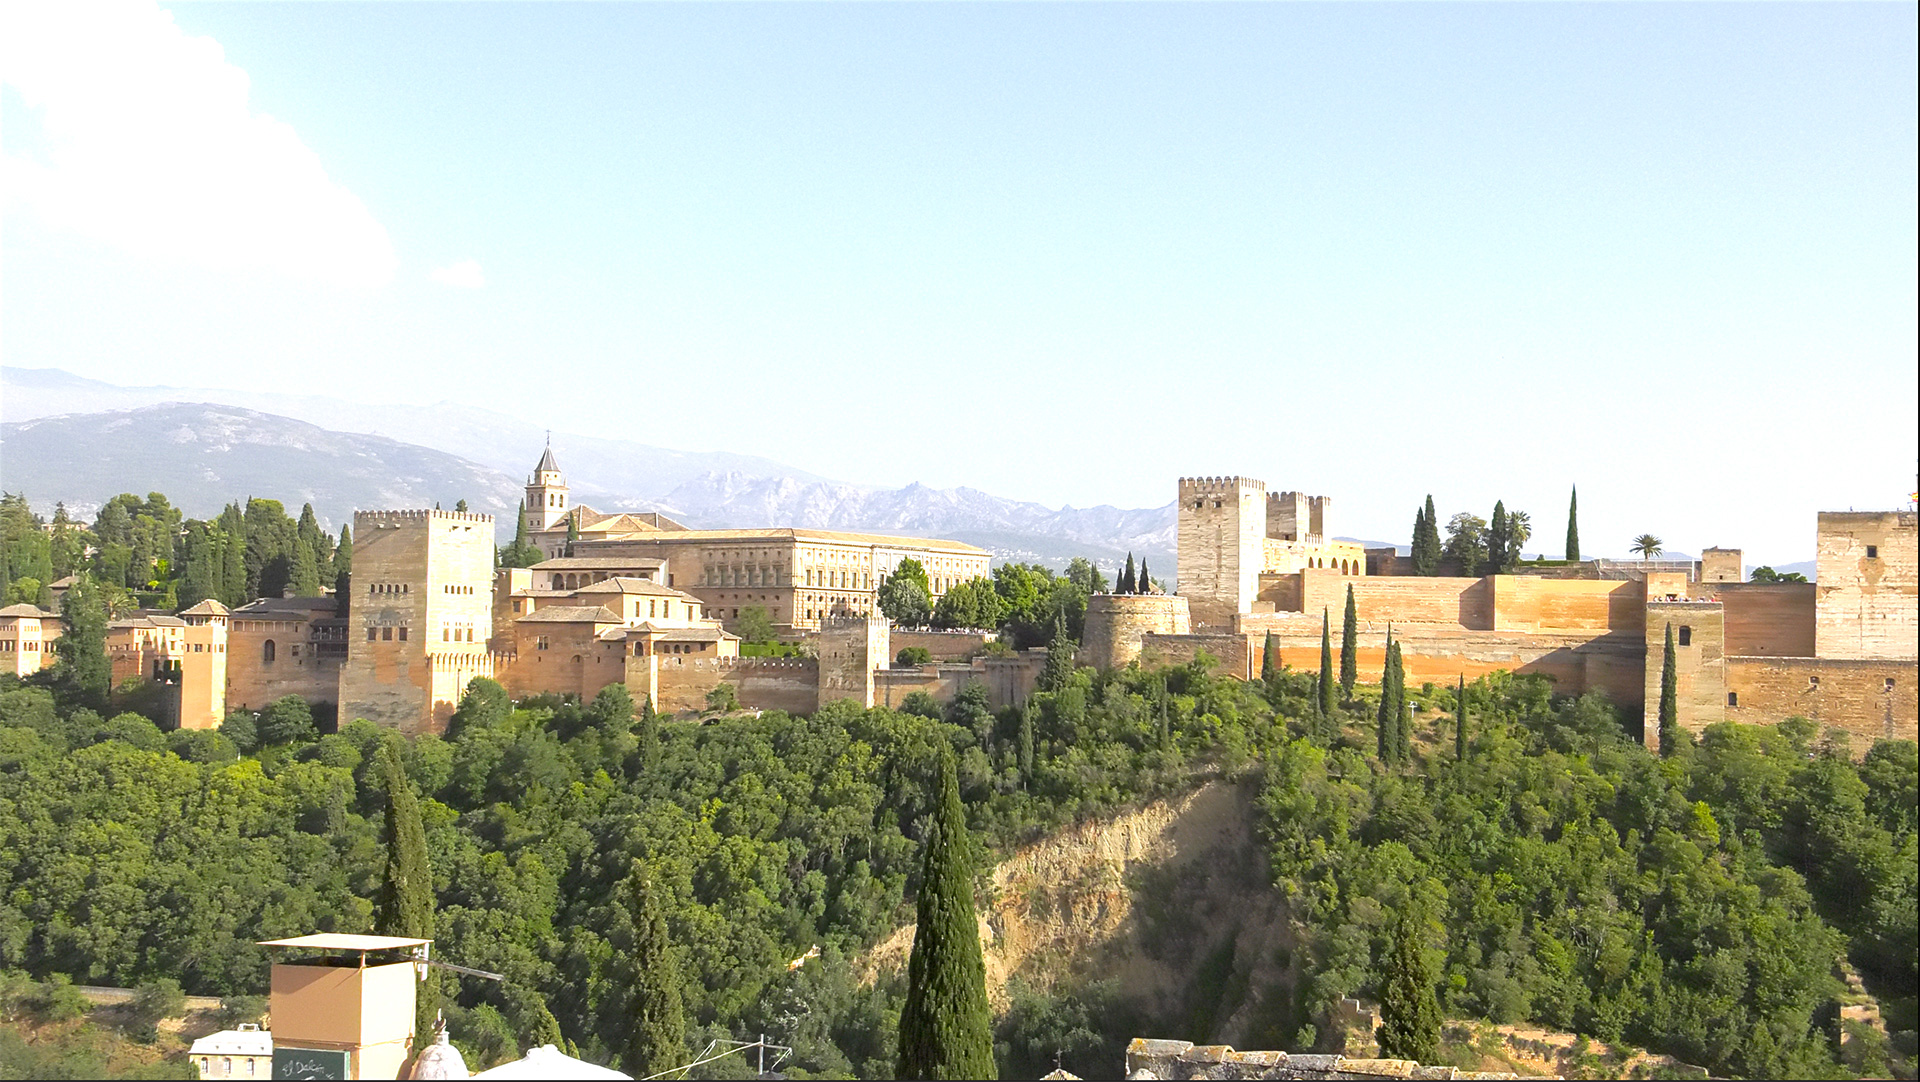
Alhambra, Granada in Spain. Yes, this seems overexposed. Click to see a larger image.

Restaurant Scene Test Image. Yes, this, too, seems overexposed. Click to see a larger image.
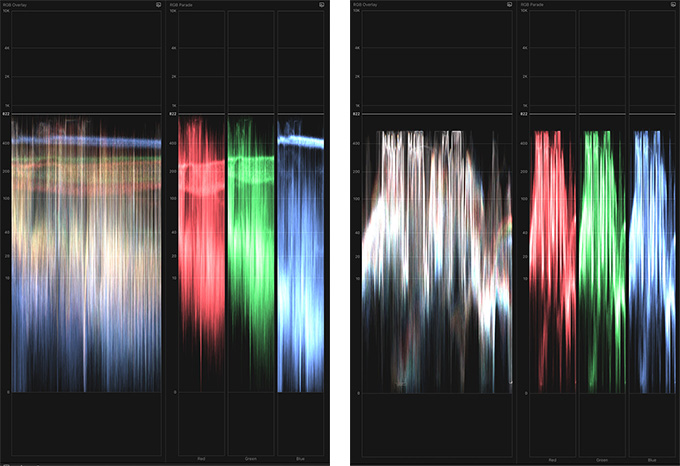
Video scopes for the Alhambra image (left) and restaurant (right). Nothing seems clipped.
Hmmm… For both images, I checked the scopes – nothing was clipped. When I selected the “Show HDR as raw values” check box in Preferences – there was no overexposure in the Viewer. Yet, the images look really bad. What gives?
I decided to finish my Spain film in a “Sub-HDR” form, while resolving the overexposure problem. I graded using “Show HDR as raw values” and the video scopes in FCP X. I was very conservative and kept my video brightness below 300 nits.
In the “Working with Wide Color Gamut and High Dynamic Range in Final Cut Pro X” white paper, Apple states that “In the case of HDR, values above 50.8% signal level (100 cd/m2) for PQ … may appear clipped in the viewer.” When I asked Apple support to elaborate, they indicated that this was beyond what they usually deal with and could not respond.
Larry Jordankindly agreed to ask his Apple contacts to resolve this enigma. The details are in Larry’s “QuickTime, Final Cut Pro X and HDR” article, but the upshot of the Apple response is that all FCP X viewers are clipped to 100 nits and the A/V Output via TB 2 connector is “unaware” of the HDR signal.
Why would Apple clip their FCP X viewers to 100 nits, when its iMac displays are close to 500-600 nits? So, for now, there’s no HDR monitoring in the Viewer.
That leaves us with the unaware A/V Output via TB 2 connector. Of course, there are “proper” interface boxes which will shape the TB 2 signal metadata and assure HDR monitoring, but they cost more than my HDR TV/monitor.
What if one uses a TB 2 to HDMI 2.0a adapter? HDMI 2.0a is HDR compliant? I tried it. No go. Here is the Gray Scale Step Ramp. It is definitely clipped to 100 nits.
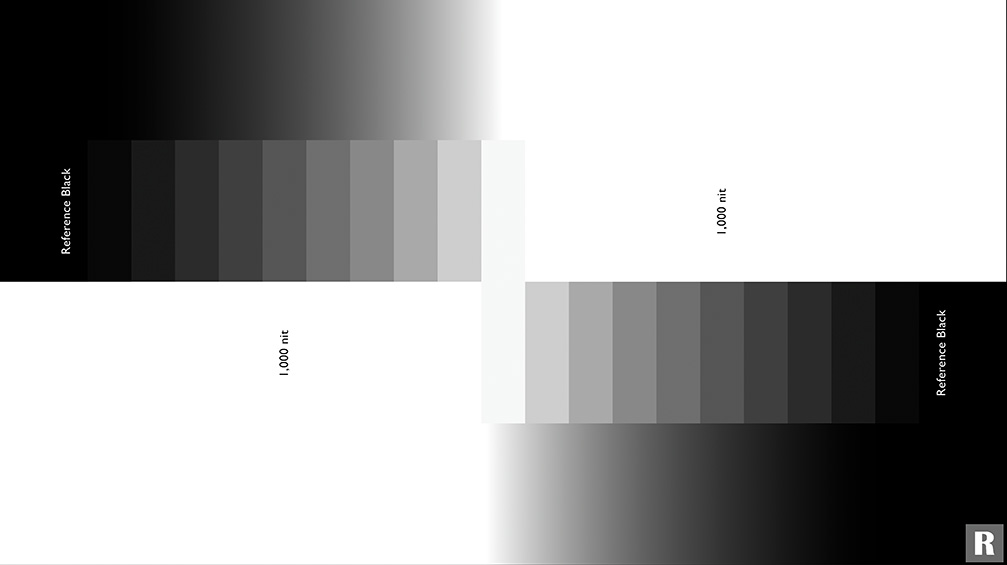
Note the clipping in the highlights, detail above 100 nits lost. Click to see a larger image.
It turns out, that when connecting a second monitor via ThunderBolt 2, or ThunderBolt 3 for that matter, the protocol is unaware of HDR values because both of these standards only include DisplayPort 1.2, but not an HDR-capable DisplayPort 1.4 (Wikipedia on DisplayPort). Next I tried to use HDFury’s Integralbox suggested in “HDR Video.” I used its newer cousin Vertex and, although the specs of the device describe the myriad ways to add a HDR metadata to a video signal, I could not make it work properly. Besides, at this point, I was ready to give up and fork over $2.5K for a “proper” interface box.
The proper box will have to be AJA Io 4K Plus. Since I need 4:2:2 10-bit, I need “Plus”, because only on “Plus” a HDMI v2.0 chip can handle 4:2:2 (not 4:2:0) at 10-bit. In addition, since my iMac has TB 2 and the AJA Io 4K Plus has TB 3, I also need a TB 2 to TB 3 adapter. TB 2 on my iMac (as opposed to TB 3) will limit my frame rate to 30, which is OK for now – all my videos are 30 fps.
Black Magic also has an IO device for HDR, but it only displays 8-bit unless you are using DaVinci Resolve.
Note on Camera LUTs in FCP X.Apple has developed the Log to Rec. 2020 LUTs for some of the popular cameras. Apple’s answer to Larry: “…it’s important to note that we’ve worked closely with third-party camera vendors (e.g. Panasonic) to create built-in, color-accurate LUTs (e.g. Panasonic V-Log) for transformation from Log to Rec. 709 or Rec. 2020. This ensures that color conversions in Final Cut Pro accurately adjust the look of the clips recorded in those cameras.”
Some camera manufacturers “stamp” Rec. 709 on all video formats out of the ENG and prosumer cameras (marketing reasons), to leave only the high-end models with possible Rec. 2020 designation. However, it is very well known that the Log footage is not constrained and is a full color gamut out of the camera. In fact, a marketing manager of a major camera manufacturer told me so.
Applying camera LUT, in my case Panasonic V-Log LUT, results in a “proper” Rec. 2020 clip, which only needs to be “shaped” brightness-wise to the PQ level. One just needs to add some saturation and sharpening to finish the process.
After the LUT, applying the Color Space Override -> Rec 2020 PQsetting in the “Show the Info Inspector” pane only changes the clip’s label from Rec. 709 to Rec. 2020, but does not change the video.
My Current Setup
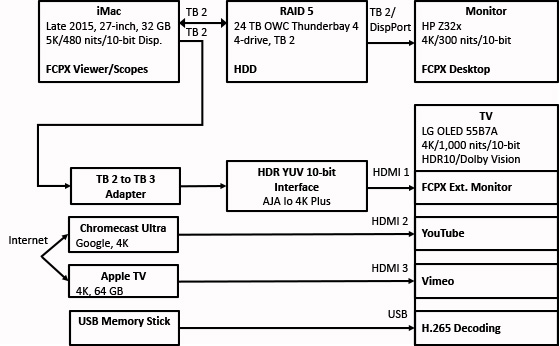
Here’s a flowchart of my current system.
Here are the images when using AJA Io 4K Plus.
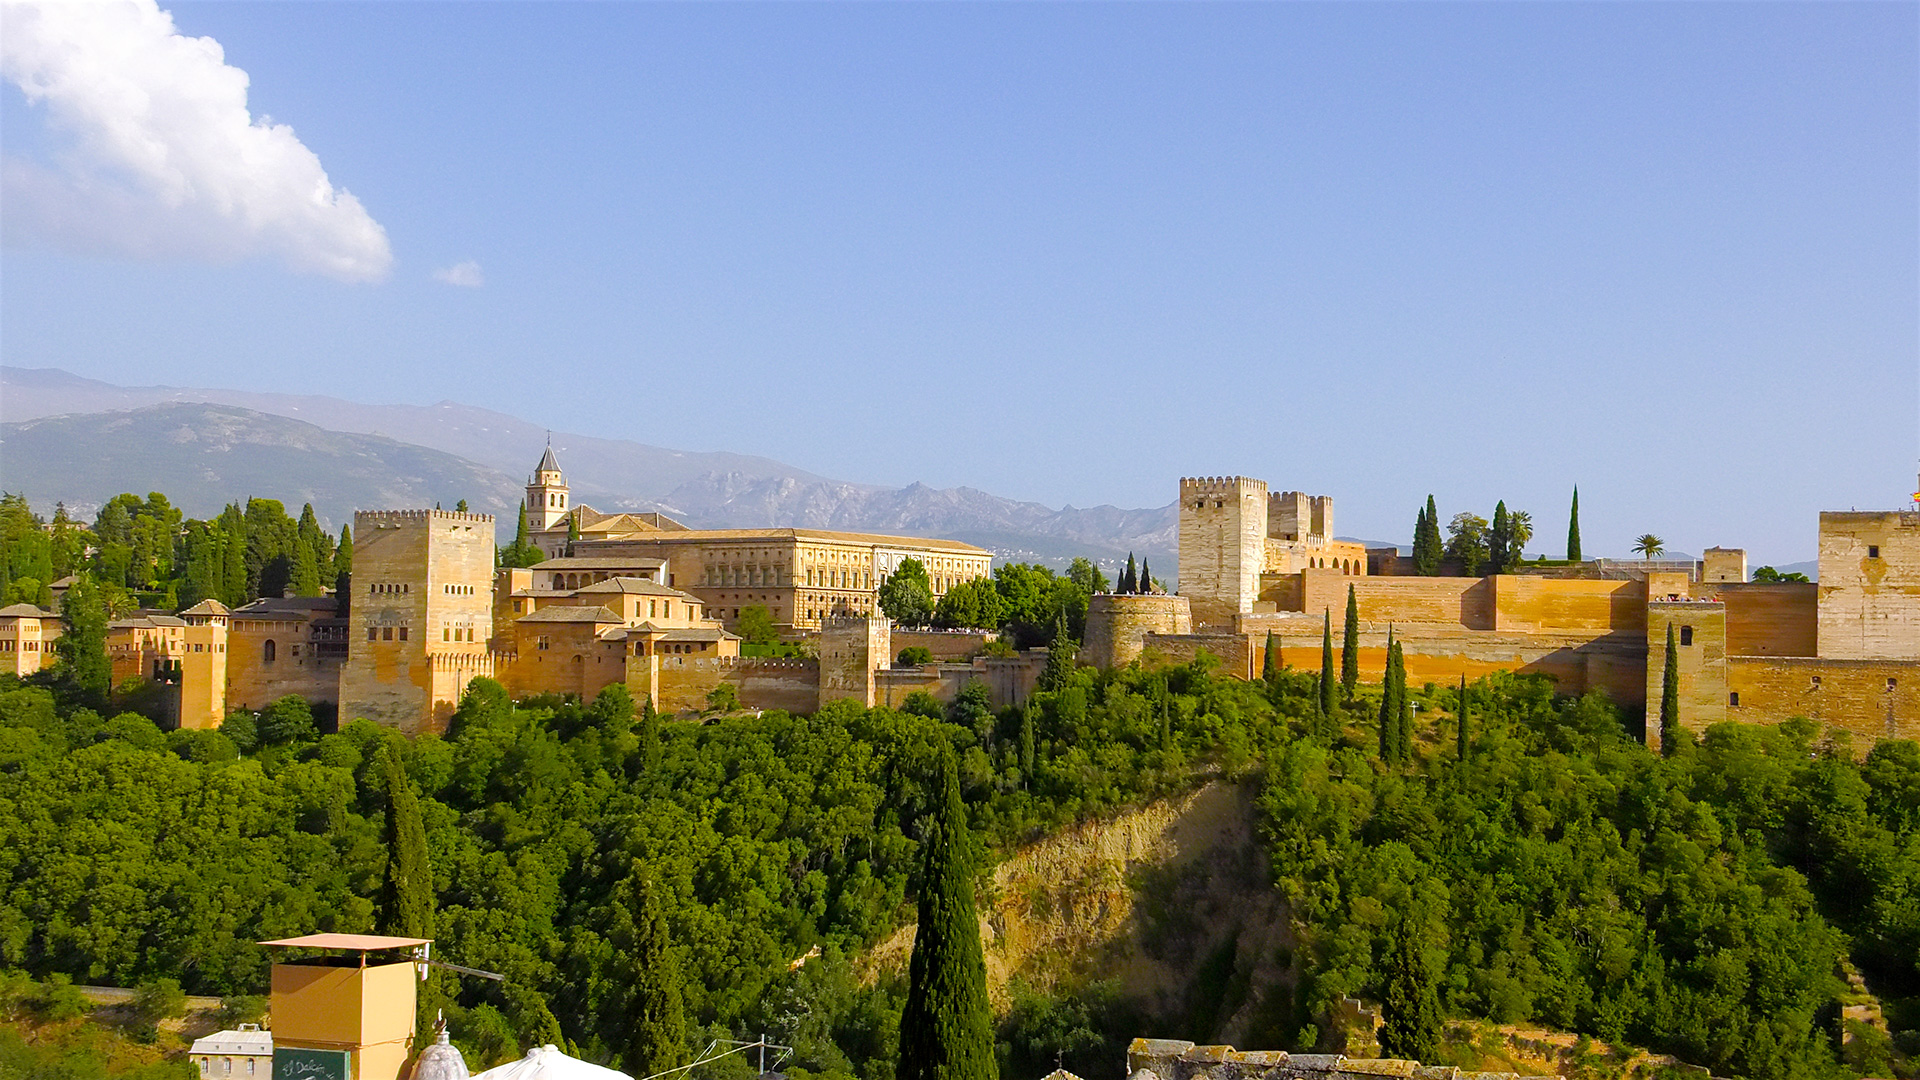
Alhambra, Granada with proper HDR values. Click to see a larger image.

The restaurant scene, also with proper HDR values. Click to see a larger image.
Shots do not appear overexposed, because there is no clipping.
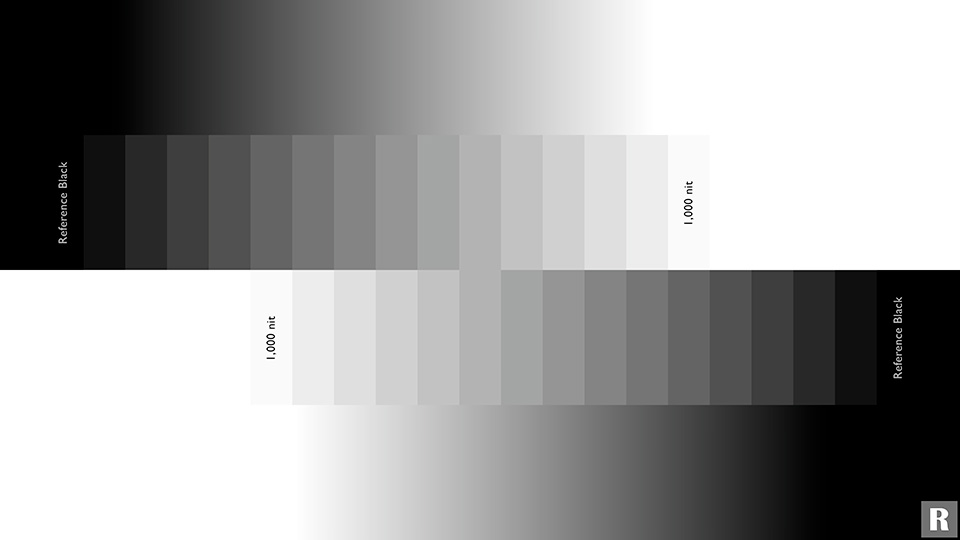
Now, the full gray-scale ramp appears. Click to see a larger image.
With this new setup, when I started to re-grade my Spain project, I am seeing nice HDR results, all the way to 880 nits in some scenes.
Note on getting HDR screen shots. Since the only way to really see my HDR clips is on my LG TV, I had to share a still frame from the FCP X project (it looks dim – iMac does not display HDR) and then “Photoshop-match-it” to the TV image.
Just in case, if you think that after sharing out a ProRes 10-bit HDR file, the QuickTime will come to the rescue and play a “Show HDR as raw values” 10-bit version, I am sorry, no. A QuickTime player can only play an 8-bit dimmed version. The 8-bit “quirk” is confirmed by the Apple answer to Larry’s inquiry.
So, to review this video before compression, I import the video back into a separate FCP X project and view its 10-bit version on LG TV.
I then compress ProRes 422 HQ file using Apple Compressor with the modified 4K (HEVC 10-bit) video settings.
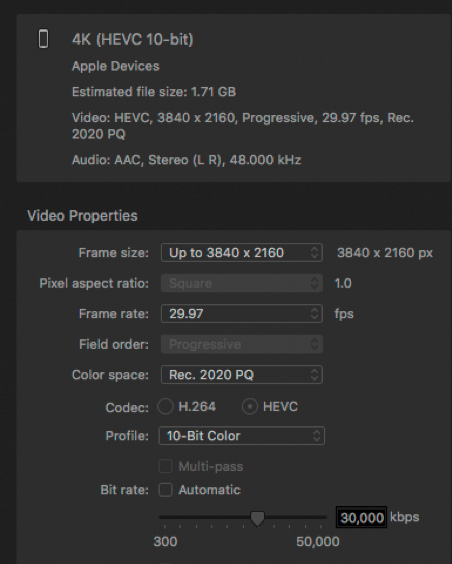
Compression settings in Apple Compressor.
Because the H.265 (HEVC 10-bit) on Mac is software-based compression, it takes 30-40 min to compress each minute of ProRes 422 HQ – result similar to Larry’s test. My 40-minute video took 22 hours yielding a 9.29 GB file.
Uploading to Vimeo and YouTube
The uploading process of a compressed HDR video to Vimeo and YouTube is the same as uploading SDR. The YouTube guidelines do not specify H.265 as an acceptable HDR format, but it works fine.
Here I discovered one more bend in the HDR road.
Even though the HDR image is gorgeous, most of the world is still happily SDR, and, unless one wants to grade two separate versions of each video, the HDR to SDR conversion process of the hosting companies is important. This gets involved, please bear with me.
- The HDR standard specifies upper brightness of 10,000 nits and, in fact, this year SONY demonstrated their prototype TV with this brightness (one probably needs sunglasses for some scenery). However, most of the current HDR offerings have around 1,000 nits spec.
- My HDR metadata specifies Maximum Display Luminance of 1,000 – because the manufacturer says it is Maximum Content Light Level (MaxCLL) of 820 – because I softly clip the brightness to 820 not to overload my “Target Consumer TV.”
- The HDR to SDR conversion software uses this parameter (820) to compute the converted SDR brightness. So, 820 should be 100% and the two gammas for HDR and SDR should also be part of the computation.
- There is also “a small thing” of converting Rec. 2020 into Rec. 709
Vimeo and YouTube do the conversion, but… the resulting video is way too bright. Vimeo’s explanation: “It’s because the PQ curve is based off 10,000 nits, but the SDR version is around 100 nits. When you tone-map (to make SDR), you assign different light level to different pixel values – the higher your peak value is, the more bits you have in lower range, which correspond to the darker colors,” and “When that value is present, we solely rely on MaxCLL for tone-mapping.”
So, I was given advice to “slowly” increase MaxCLL, by say 100, and see when SDR will begin to look “normal.” I had to do a binary ping pong search and my number for MacCLL is 4,000. It is kind of contra intuitive. But, if one overlays three ranges 0 to 100% for SDR, 0 to 1,000 nits and 0 to 10,000 nits for HDR, one will see that the same level of the HDR video brightness will lead to a darker image in SDR for the 0 to 10,000 nit range than for the 0 to 1,000 nit range. The quality of the converted (SDR) video leaves a lot to be desired, and for a really good result one would still need to grade a separate Rec. 709 version.
But, what about an HDR image? Will it not be altered when MaxCLL is 4,000? According to Vimeo it will not: “… adjusting Maximum Content Light Level (MaxCLL) will only affect the SDR version on Vimeo, not the HDR version. We use this metadata to determine the brightness of your SDR version.” I checked both video hosting sites – the 4,000 number does not appear to change HDR video.
All in all, it was an “interesting” road to HDR. If you are curious, you can see my first re-graded 5 min video at vimeo.com/264992227 or www.youtube.com/watch?v=liTP5eeWi0w.
What is your experience with FCP X and HDR?